

Hello again, friends.
Two posts in one week! I think this is a record for us.
We finally had a chance to catch up on life after being super busy the last few months. It’s hard to believe that we’ve renovated 4 bathrooms and a house this year! We finished our Pearl St. bathroom renovation in February, then bought a historic townhome in German Village that we renovated and furnished, and just finished remodeling a client’s dated bathroom last week, too. Even though we loved doing all of these projects, we’re loving this much needed break from the craziness just as much 😉
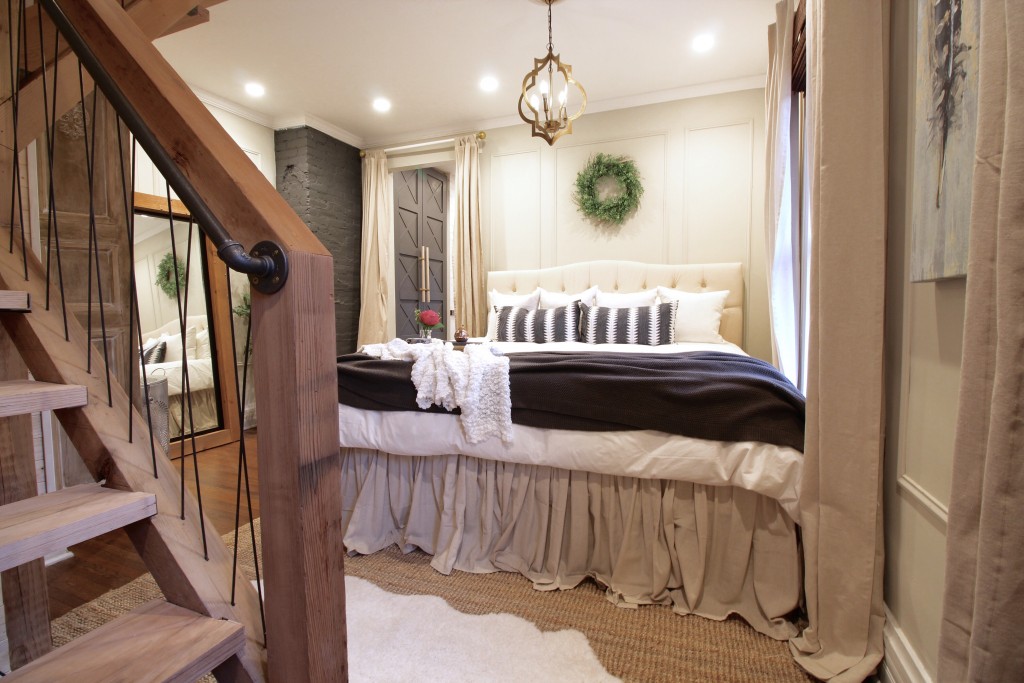
We’ve been posting lots of progress photos on Instagram, including some of the master bedroom at our Pearl St. project…
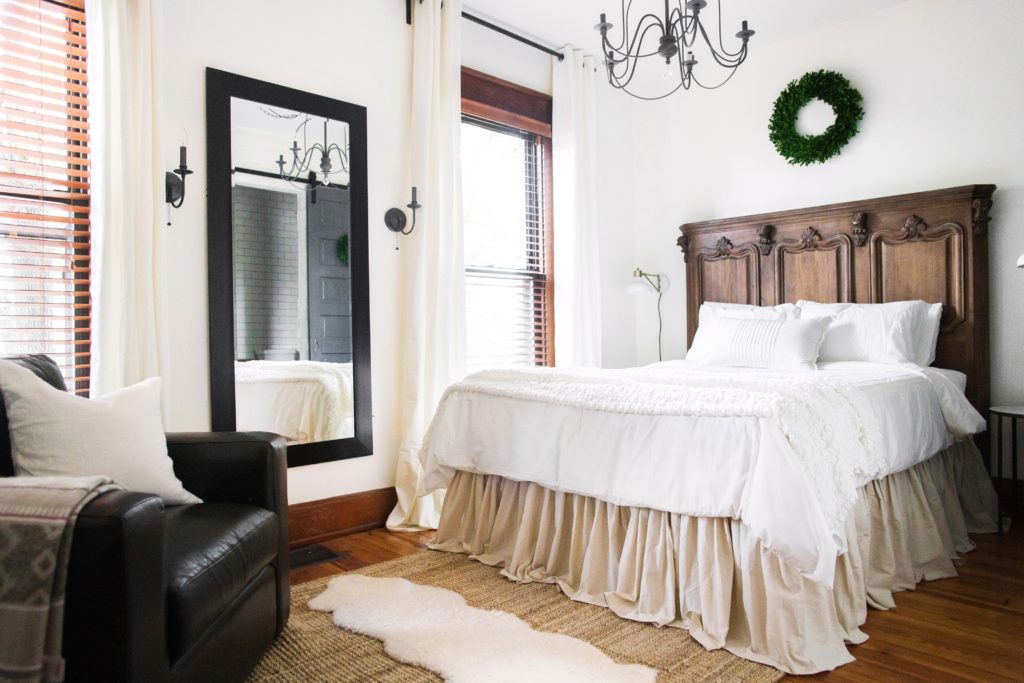
 … and the master bedroom at our new townhome. (Update: see more photos of this room & the new bathroom we added here!)
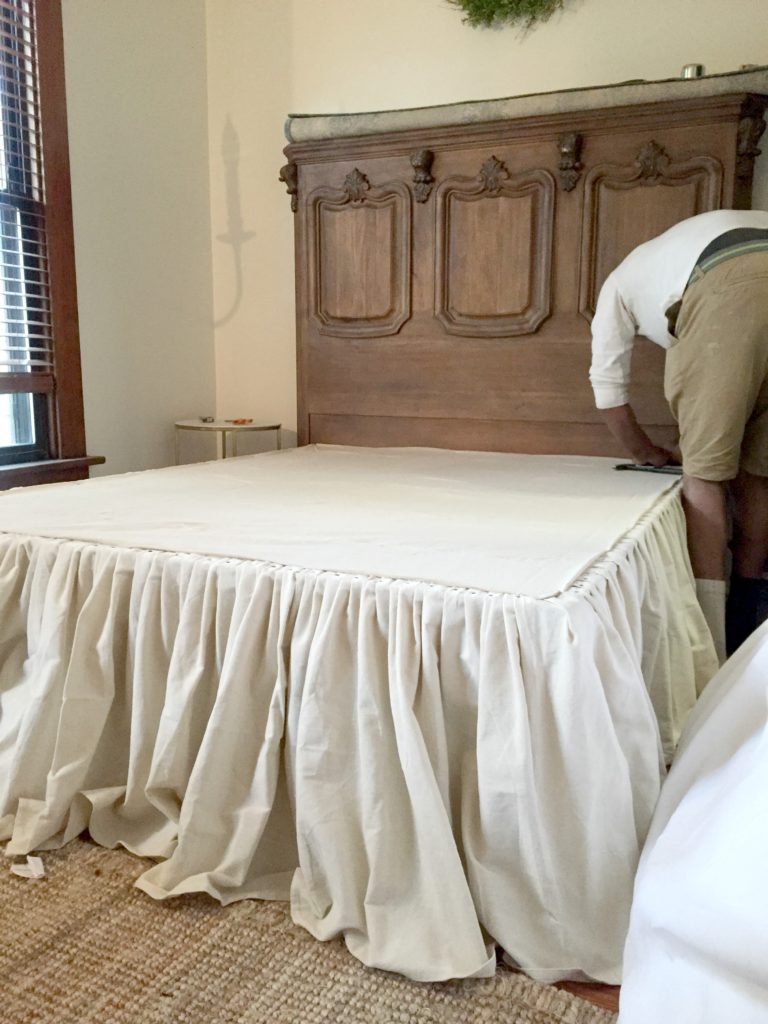
 When we mentioned that we made the bed skirt ourselves out of painter’s drop cloths, and no sewing was involved, many of you asked for a tutorial. Here goes!
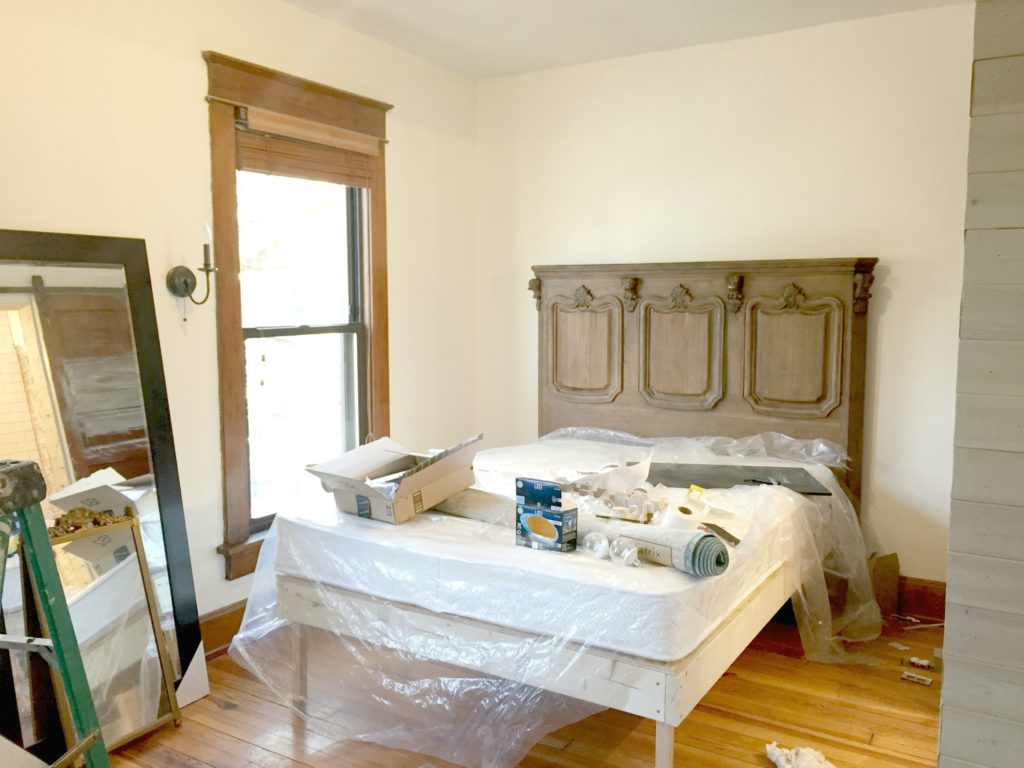
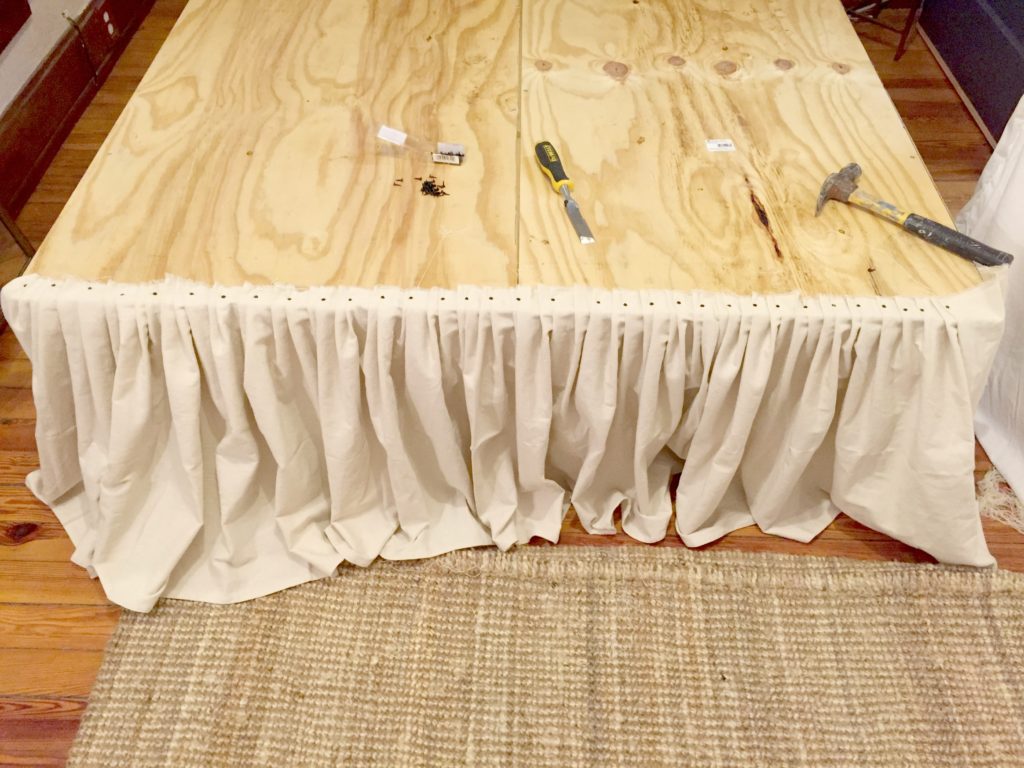
Bryan started off by making a very basic bed frame out of plywood and 2×6’s. It cost us about $50 and sits 18″ off the ground, allowing for storage underneath. The headboard was a lucky $200 clearance find from Arhaus Outlet here in Columbus. It was discounted because just the headboard was being sold, not the entire bed frame (which originally retailed at over $3,000!).
To snazz up the frame, we made a flowy, Restoration Hardware inspired bed skirt. Between Michael’s and Home Depot, we were able to find everything we needed. Total cost for us was under $50, since we had everything except for the cloths and tacks.
Materials Needed
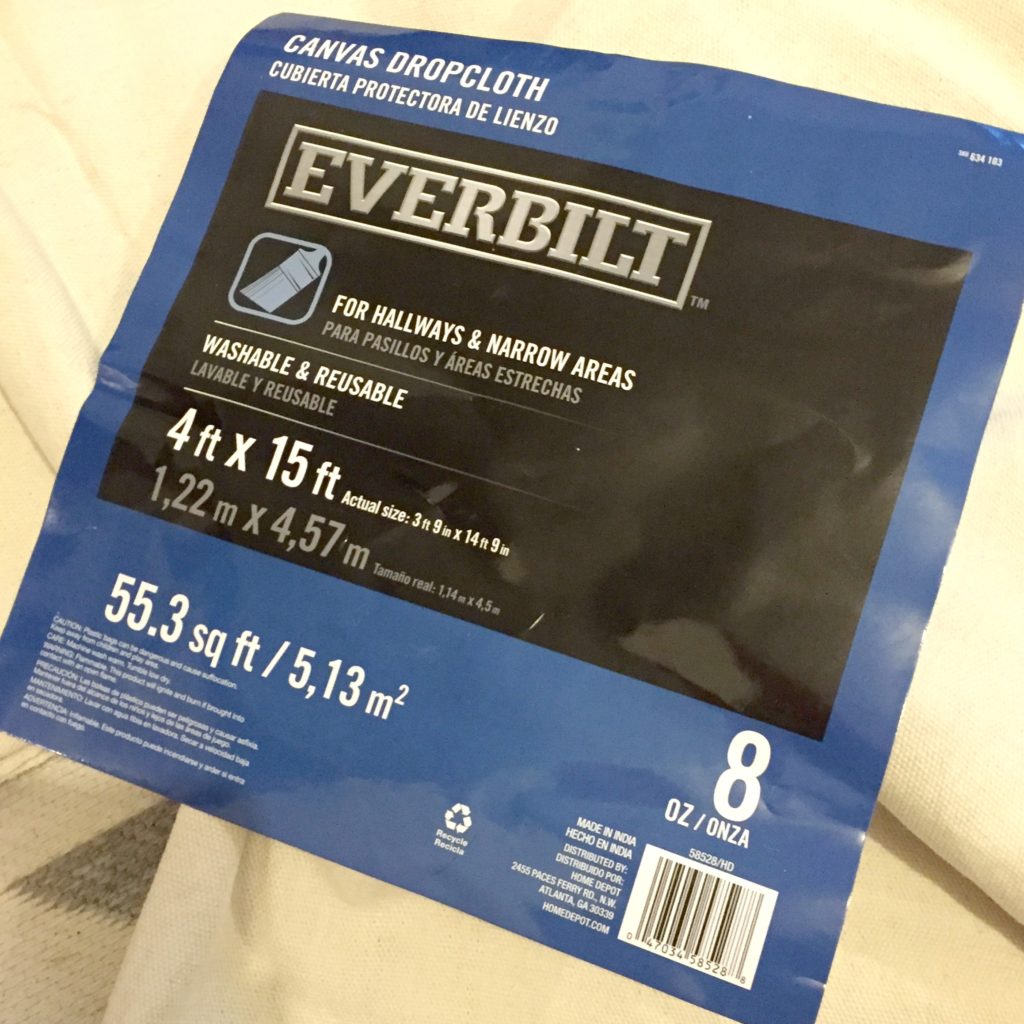
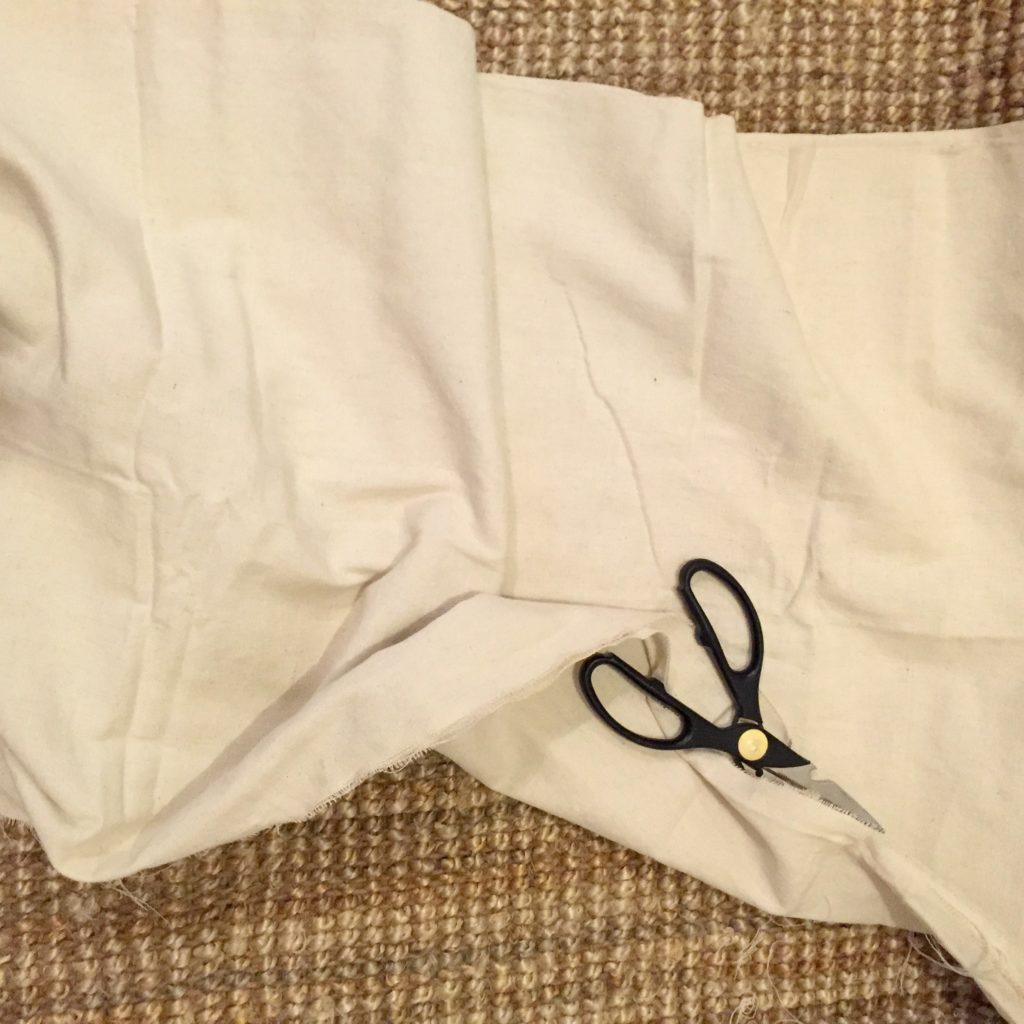
- Two 4×15 regular 8 oz. canvas drop cloths (see below on how to measure)
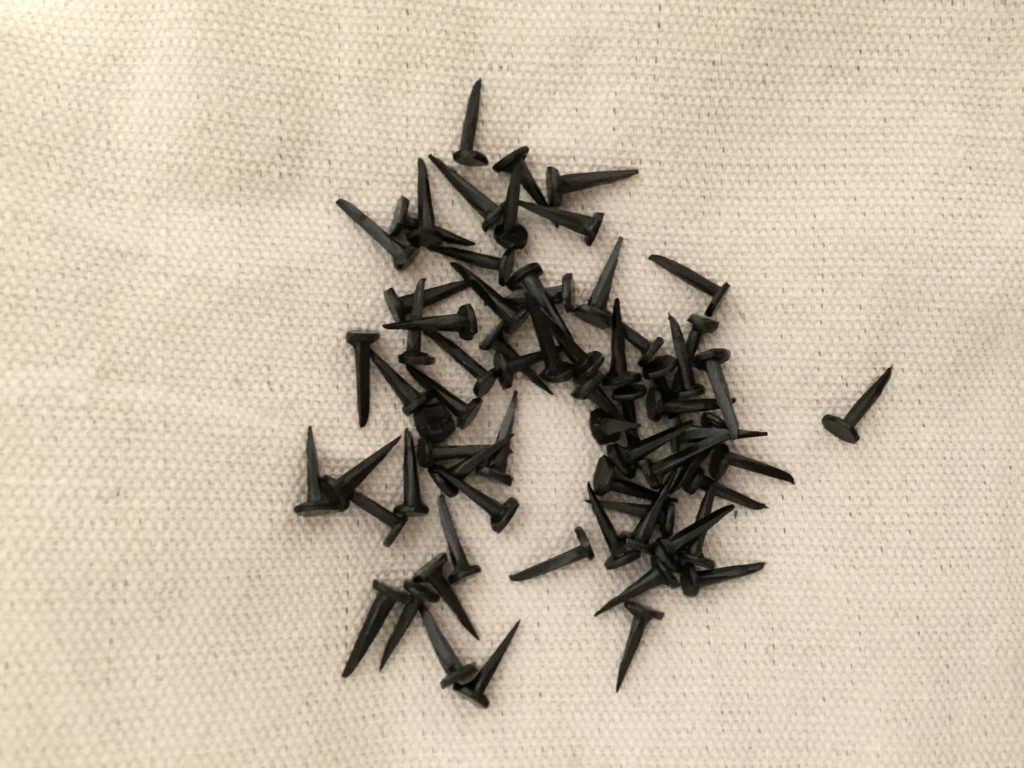
- Tacks
- Fabric scissors
- An upholstery hammer (if you don’t have one, a regular small hammer will do the trick)
- A 6×9 drop cloth for the top (optional)
Measuring for the Skirt
Before going shopping, it’s important to take into account 3 things: 1) the drop, or distance between the bottom of your mattress and the floor, 2) the length of your bed that the skirt is going to cover, and 3) the gathered length of fabric you’ll need.
1) Drop
We had an 18″ drop between the bottom of the mattress and the floor. We wanted the skirt to pool a bit at the bottom, so we added 2″ to account for that. We also knew we would need 2+” extra to attach it to the top of the frame, so we rounded our drop up to 24″ just to be safe. That number also worked really well with our 4′ x 15′ drop cloth – we only had to cut it once down the middle.
2) Length of the bed that the skirt will cover
These measurements assume that three sides of the bed will be covered with the bed skirt:
A Queen has 220 inches of space to cover (80in left + 80in right + 60in end = 220 inches total), or 19 feet
A King has 236 inches (80 + 80 + 76) of space to cover, or 20 feet.
A Full has 204 inches (75 + 75 + 54) of space to cover, or 17 feet.
A Twin has 189 inches (75 + 75 + 39) of space to cover, or 16 feet
3) Total gathered length of the bed skirt fabric
To get that romantic, expensive look on the bed skirt we made, we used about 3 feet of drop cloth per 1 foot of length. You can probably get away with 2, but just know that the more you stretch it, the more you change the look. For our Queen bed, we multiplied the length from step two by 3 to get our total length of fabric needed.
A Queen needed 19′ x 3 = 57′ of drop cloth.
A King would need 20′ x 3 = 60′ of drop cloth
A Full would need 17 x 3 = 51′ of drop cloth
A Twin would need 16′ x 3 = 48′ of drop cloth
Getting Started
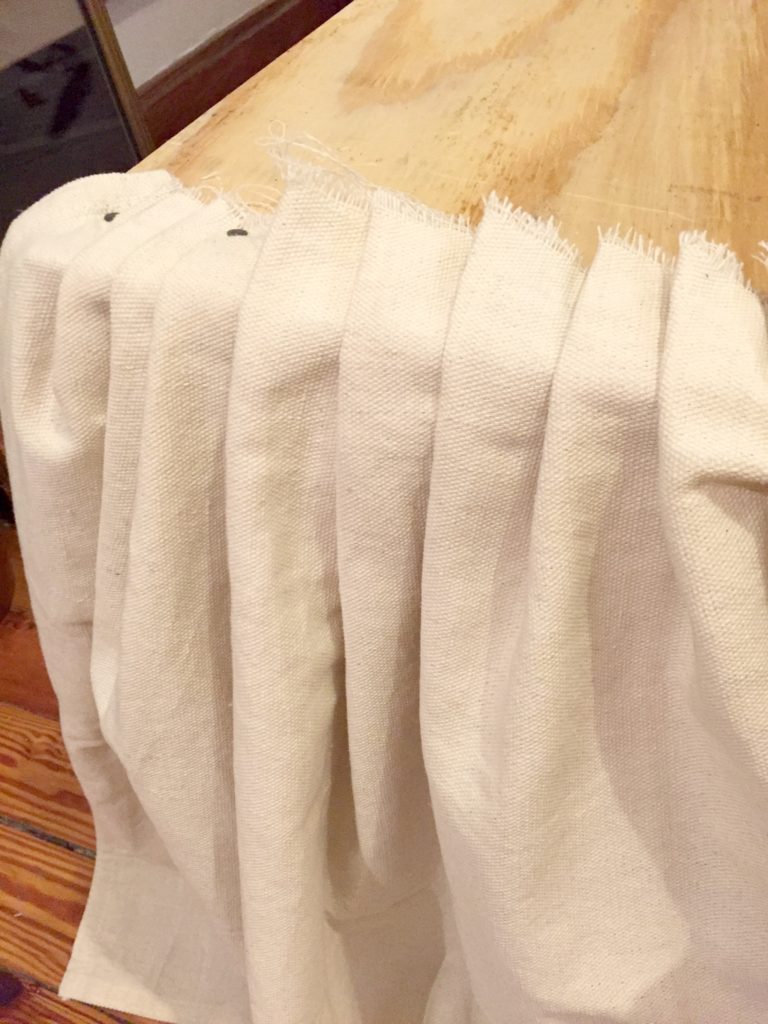
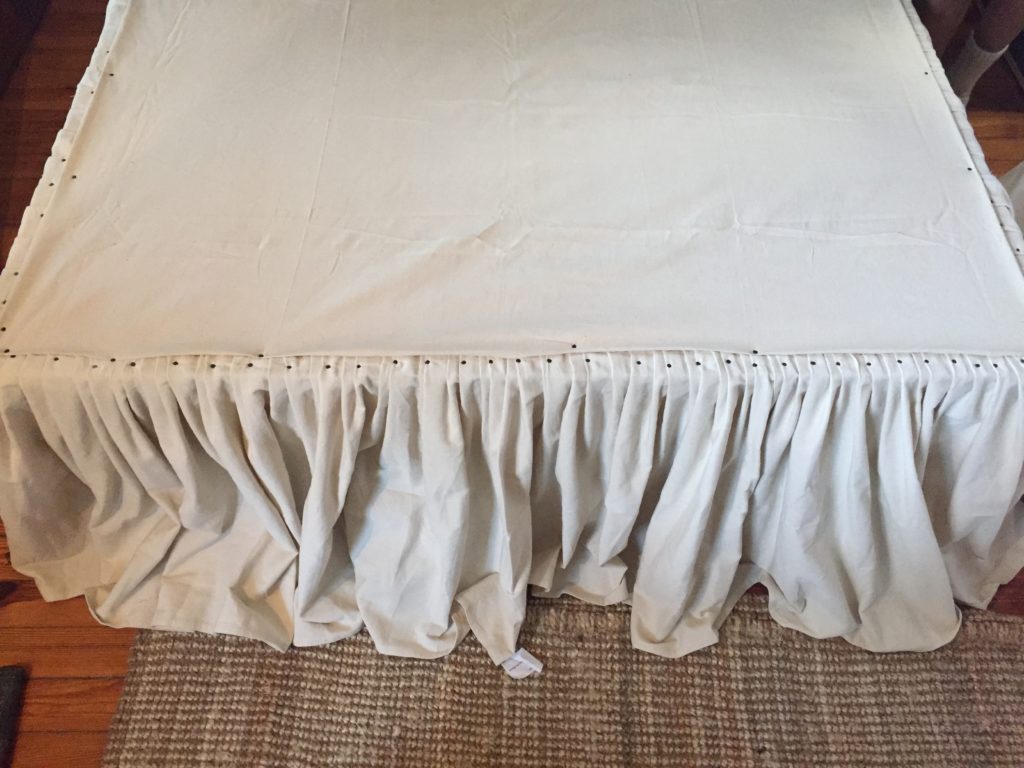
We used two 4’x15′ hallway drop cloths for our Queen bed, and cut them each in half to get two 2’x15′ strips. The four 2×15 strips gave us about 60 feet of gathered length to work with, and 2 feet of height to work with.
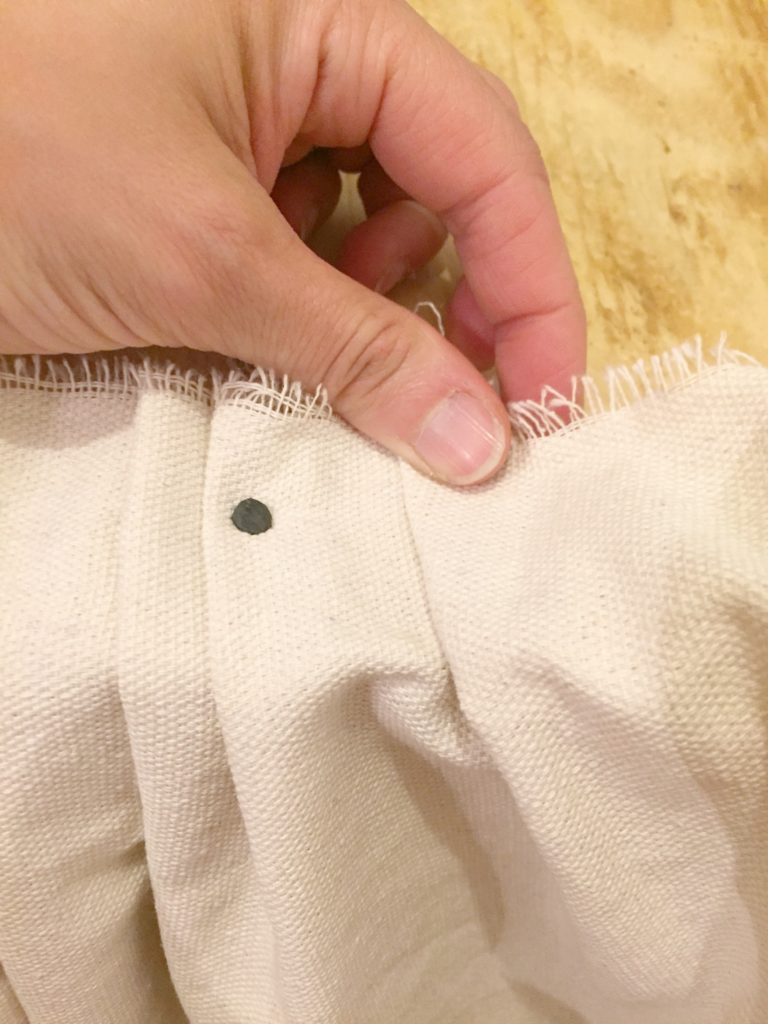
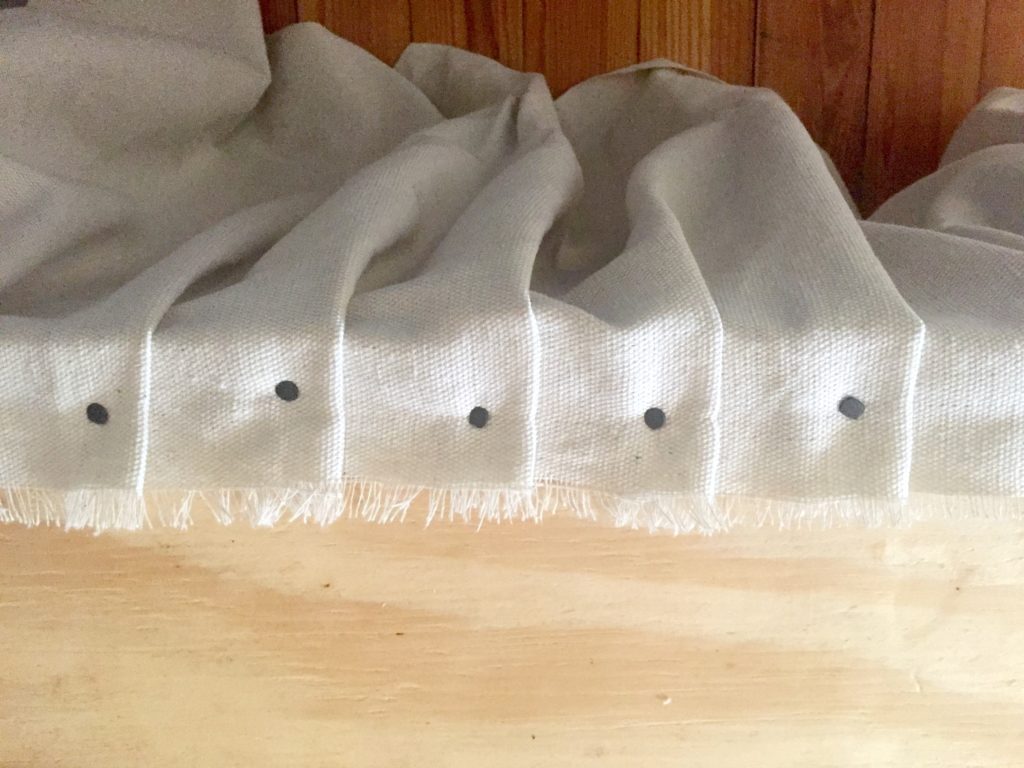
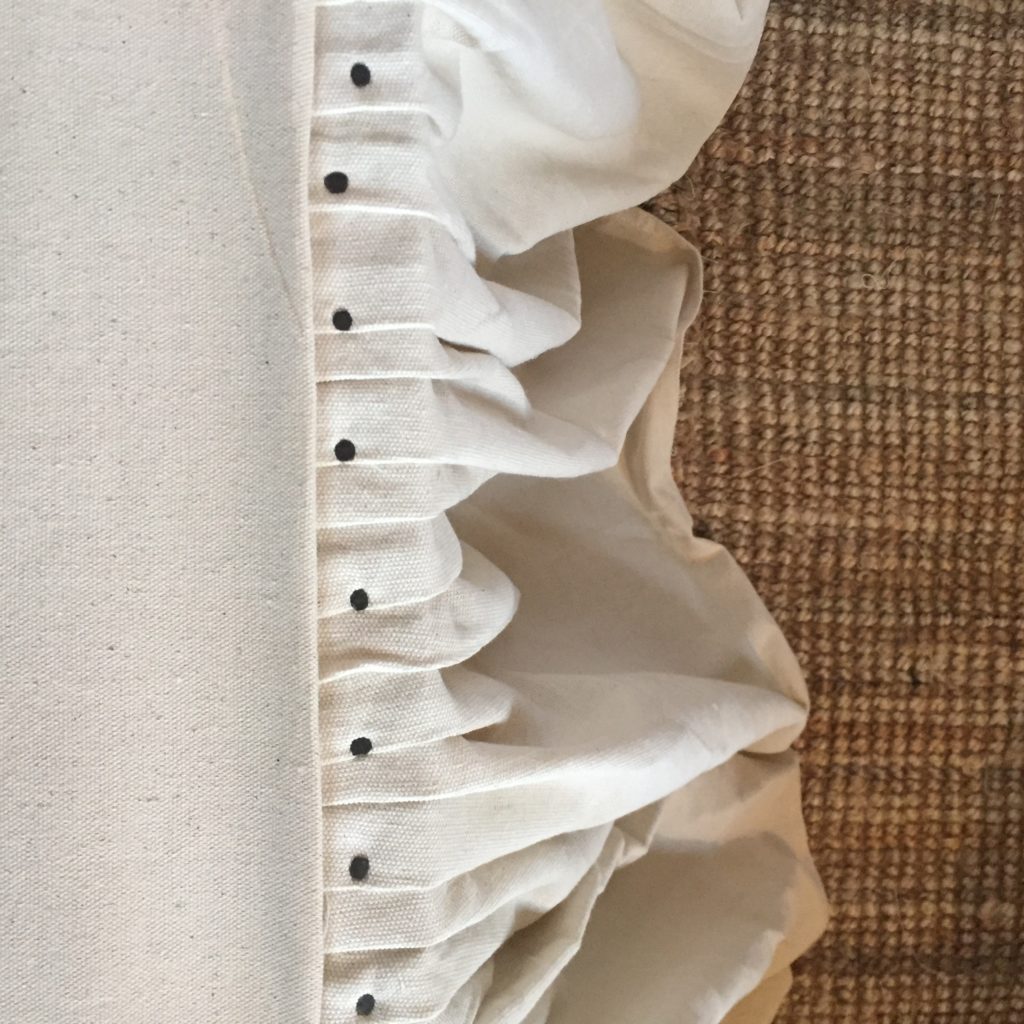
 To attach the skirt to the frame, we used tacks. One fold a time, one tack at a time.
Having the skirt attached to the bed works for some people and won’t work for others. We’ve made this skirt for four different beds so far, but none of them get high traffic or are exposed to lots of pets, frequent spills, dirt, etc. We vacuum and spot clean as needed, just as we would an upholstered bed or couch, and that does the trick. Even if this isn’t for you, you may be able to apply the concept to one of your own that you’re able to remove.
 Because we had ugly plywood on the top of our frame, we covered the whole thing with another 6×9 drop cloth cut to size. We folded the raw edges under to give it a clean look.
Then we added our mattress, made the bed, and voila! It took us about 2 hours for the whole thing.
 What do you think? Would you make a bed skirt out of a drop cloth for your bed?


I love this! I was looking for some inspiration to make over our bedroom and this did it. Thank you!
Aww, thank you so much Lesha! Best of luck with the makeover!
GENIUS, YOU GUYS ARE FREAKING GENIUSES! DO YOU HAVE ANY IDEA HOW MUCH MONEY YOU ARE SAVING ME? DO YOU! DO YOU REALLY? LIKE I AM READY TO WALK TO HOME DEPOT RIGHT NOW. I HAVE BEEN LOOKING ON EBAY, ON EVERYWHERE FOR AN AFFORDABLE SKIRT THAT LOOKS THIS BEAUTIFUL! IM NOT RICH AND I DON’T HAVE A HANDY MAN, BUT I WORK HARD I PAY MY TAXES. I RECYCLE. WHY CAN’T I HAVE NICE THINGS TOO? IM APPALLED AT WHAT THEY WANT FOR SOMETHING LIKE THIS. DON’T THEY NO I’M A SINGLE MOTHER? IT’S CRAZY TO HAVE TO PAY FOR A BED SKIRT WHAT YOU WOULD EXPECT TO PAY FOR THE COMFORTER. BY THE TIME I FINISHED, MY DARN BEDDING WOULD HAVE BEEN MORE THAN THE BED. THANK YOU THANK YOU THANK YOU THANK YOU! YOU MADE MY DAY!!!!!!!!!!!!! BY THE WAY DID I SAY THANK YOU? OK HERE’S WHAT I’M GOING TO NEED YOU TO DO. I’M GOING TO NEED YOU TO KEEP POSTING EVERY FREAKING ANYTHING YOU DO. IF YOU MAKE A TRASH CAN I WANT A POST. WHILE YOUR AT IT, IF YOU COME UP WITH SOME AMAZING DEVICE THAT WILL MAKE MY 19 YEAR OLD MAGICALLY WASH THE DISHES WITHOUT BEING TOLD, AND MAKE ME BREAKFAST IN BED I’M GOING TO NEED YOU TO BLOG OR PIN THAT OK.. WE GOOD ON THAT?
Regina, Haha!! SO glad you found it helpful!
This is so beautiful. I’m gonna do a sewn one tho because we have Littles and pets and….wellll…. But someday my hubby and I wanna build ourselves a bed and this will be just the thing for it! But I will use all your measurements for my sewn one, that’s half the work, the math of it all! Thanks SO much!
You’re so welcome, Lea! I’d love to know how your sewn one comes out!
I love this idea, but would also need to sew mine. Did you wash the drop cloth first ? And did you need to do anything special when rounding the corners ? (Thanks for the measurements … my bed also requires an 18″ drop, so you saved me some math, lol)
Thanks Winnie! Yes, we’d suggest washing first. We just kept the pleating going on the corners, and if there was a break in the fabric pieces, we overlapped the edges.
Here is a tutorial for a sewn bedskirt, but I like y’all’s better!
http://www.tidbits-cami.com/2015/08/diy-gathered-bed-skirt-from-a-drop-cloth.html
Awesome!
I found this over on Hometalk! This is brilliant! I have been shopping for the perfect dust ruffle for a cottage style guest room and finally found one for $320 that is not in the budget. Now I have the answer! Thank you so much for this great idea! I have a link party that opens on Monday at 8 PM EST that I would LOVE for you to come by and share this! I imagine lots of folks could use this great idea! I know I will be using this very soon!!
Thanks so much Chloe! Would love to share! Just let me know the details 🙂
Love the Bedskirt, I have bought different ones, not happy with any, so I will try this, you and your Husband are really talented, I saw your website on a Friends page, so glad I found you!
Thanks so much Sandra!!
Love this! Did you use a box spring since it is already 18 inches off the ground?
Thanks Kaitlyn! No we didn’t, we made a platform bed frame that sits 18″ off the ground, and then put the mattress on that.
Since you put the tacks into the plywood, do you not have a boxed springs? I’m trying to decide if I could tack into the bed springs or should sew mine. I love this look!
Hi Heather, Thanks for your note! That’s correct – we built a platform bed, so no box spring needed.
So beautiful and so stinking simple!! Love love love your style!
Thanks so much!
Hi there, I just love the bed and and the whole room. Do you have plans or advice on building the platform bed. I love the simplicity of this bed. We have wanted to build one but when you search platform beds you get the ones that sit on the floor. Any advice you could give would be wonderful or if you know of any online plans that would be appreciated. Again love this. Tami 🙂 Nova Scotia, Canada
Hi Tami! Thanks so much. We didn’t put together plans or a tutorial, but our frame looks something like this under the bedskirt: http://www.glitterandgoatcheese.com/2013/11/25/our-hand-built-king-sized-platform-bed/. We used plywood on top instead of the 1×3 slats that are in this tutorial, and made our frame about 18″ off the ground. I hope this helps!
Love the look. Have done this type of thing before Looks and easy on the budget. Worried about the skinny legs at end of bed. Only look like 2x2s. Hope I’m wrong!!
Thanks! We’ve had the bed for a year and it’s holding up well 🙂
Wondering how many of the tacks you purchased? I’m ordering drop cloths on Amazon and followed your link for the tacks but it doesn’t have a number and I wondered about how many you used?
Hi Aubrey, we used 1 tack per 1-2 inches in ours. Depending on the size of your bed, you’d need:
– Queen = 220 inches (80in left + 80in right + 60in end = 220 inches total) // 220 tacks
– King = 236 inches (80 + 80 + 76) // 236 tacks
– Full = 204 inches (75 + 75 + 54) // 204 tacks
– Twin = 189 inches (75 + 75 + 39) // 189 tacks
Hope this helps! Good luck with your project!
Absolutely gorgeous! Just the inspiration and idea I needed for the guest bedroom at our new house! Thanks!
So happy to hear that Christy!
This is an amazing idea. My son has an extra long twin but since his bed sits against the wall with the long (length) side of the bed, a regular dust ruffle will not work. I need it to cover the head/foot/and one length of the bed. I think this will work perfect. Because it is canvas material, do you think I should be able to dye it? Thanks again for the great information.
Hi Cheryl! Honestly, I don’t know… I’ve seen bleached canvas drop cloth curtains etc that are lighter, but I don’t think I’ve seen dyed. I’d check Pinterest/Google – I’m sure someone has done it before!
What a great post!!! Everything in this room is so beautiful!!
Catherine, I can’t tell for sure from the photographs, but it looks like the bottom edge of the drop cloth is hemmed. Was it hemmed on both sides, and you just cut it in half and used the hemmed edge at the bottom? Whatever you did, it is gorgeous! So full and romantic looking!
Thanks Jeri! The drop cloths we used had a hemmed edge on all 4 sides, so that’s exactly what we did. When we cut it in half, we put the cut (unfinished) edge on the top and left the finished edge out, which made it easy to get a finished look without sewing 🙂 Hope this helps!
We built a house last year and my husband built us a brand new bed. This is the exact type of bedskirt I had him to it for us. I love it!!!
Amazing! Isn’t it the best? Thank you for sharing ♥️
[…] To see more: https://beginninginthemiddle.com/diy-no-sew-drop-cloth-bed-skirt/ […]
Love this and is on my ‘to-do’ list for 2018!! Yay!
One question, did you wash the cloths first?
Thanks!
Yay! We didn’t, but I’d suggest washing them.
[…] @beginninginthemiddle […]
What if my bed frame doesn’t have plywood on top, I have a metal bed frame?
For this one we nailed it into the wood so you’d need some sort of wood surface to make it work. I’m not sure if putting a sheet of plywood on top of the metal frame would work or not!
Looks great!! What is the amount of fabric used for ea ind pleat?
Yes, that was something I was trying to find as well. Also did you do anything to the bottom to keep it from fraying over time. I didn’t see either mentioned. Love this project and cant wait to do this to our bed as well.
We kept the finished side of the drop cloth exposed on the bottom, and the cut side we tacked to the top.
It’s great. Wonderful diy project!
Where did you get that beautiful headboard to go with the great bedskirt??
Arhaus!
I have been looking at bed skirts til I can even see anymore. I ran across your AWESOME instructions while looking for one you don’t have to sew, since I am not privy to that. Anyway, I saw a couple of questions about the bed frame. I currently have a queen size bed on box springs. I don’t want to have my son do yet another project for me so I was hoping I could just tack to the “hard” edge of the box spring and make this work. Have you had anyone else say they have done it this way? Please say yes!!!
I don’t see why it wouldn’t work if the box spring is wood! Great idea.
Thanks for this! Sorry if i missed it but i can’t see anything about how to do the actual pleating… do you measure it out, how do you do the folding etc.? Does anyone know (maybe it’s in a different post?) thanks so much
Beautiful but this method not practical. I like to “WASH” my bed linens. So you get maybe 6 months to a year on this one then what? All that work to ..do it again? Nope. I will do one that can be washed.
We made these bed skirts on 4 different beds at our short-term rental properties in 2016. We still own them and every one of them still looks brand new 5 years later. We don’t allow pets, so that’s of course a big factor. We vacuum regularly and spot treat as needed, just like other furniture pieces that we can’t throw in the wash. We’ve heard some readers have tried Velcro – could be something to look into!